Use of FIB-DIC to measure the residual stress of a SnO2:F based coating on glass
- Abstract number
- 310
- Presentation Form
- Poster Flash Talk + Poster
- DOI
- 10.22443/rms.mmc2021.310
- Corresponding Email
- [email protected]
- Session
- Poster Session 2
- Authors
- Jauffrey Lescoffit (2, 1), Dr Liam Dwyer (1), Dr Irina Gordovskaya (1), Dr Tan Sui (2), Dr Mark Baker (2)
- Affiliations
-
1. NSG Pilkington
2. University of Surrey
- Keywords
Residual stress, strain relaxation, focused ion beam milling, FIB, scanning electron microscopy, SEM, digital image correlation, DIC, FIB-DIC, thin film, coating, glass, FTO.
- Abstract text
Focused ion beam – digital image correlation (FIB-DIC) is a recently introduced residual stress measurement technique which could be relevant for many industries. This work presents promising results regarding its applicability to thin-films deposited on glass substrates.
Thin-films are applied on glass to improve the optical, electrical and mechanical properties of innovative products. With the evolution of coating technologies, these films now consist of stacks of layers in which residual stresses systematically arise. Assessing these stresses is challenging as they can only be measured indirectly or using diffraction techniques in crystalline materials. FIB-DIC is a residual stress measurement technique relying on focused ion beam (FIB) milling and digital image correlation (DIC). This technique could be well-suited for coatings on glass as it can be applied to measuring the residual stress of non-crystalline materials. The strain data were calculated by applying DIC analysis to a set of SEM micrographs acquired at regular intervals during the milling procedure. Relaxation curves can then be obtained by plotting the relaxation strain ε as a function of the relative milling depth h/D. A generalised form of the curves typically obtained by FIB-DIC has been determined [1] and can be fitted to the experimental data (Fig. 1). The stresses can then be calculated using the elastic constant of the coating material and Hooke’s law.
Fig. 1: Principles of the FIB-DIC residual stress measurement technique: sets of SEM images acquired during strain relaxation induced by double-slot FIB milling are analysed by DIC and the stress is calculated via Hooke’s law.
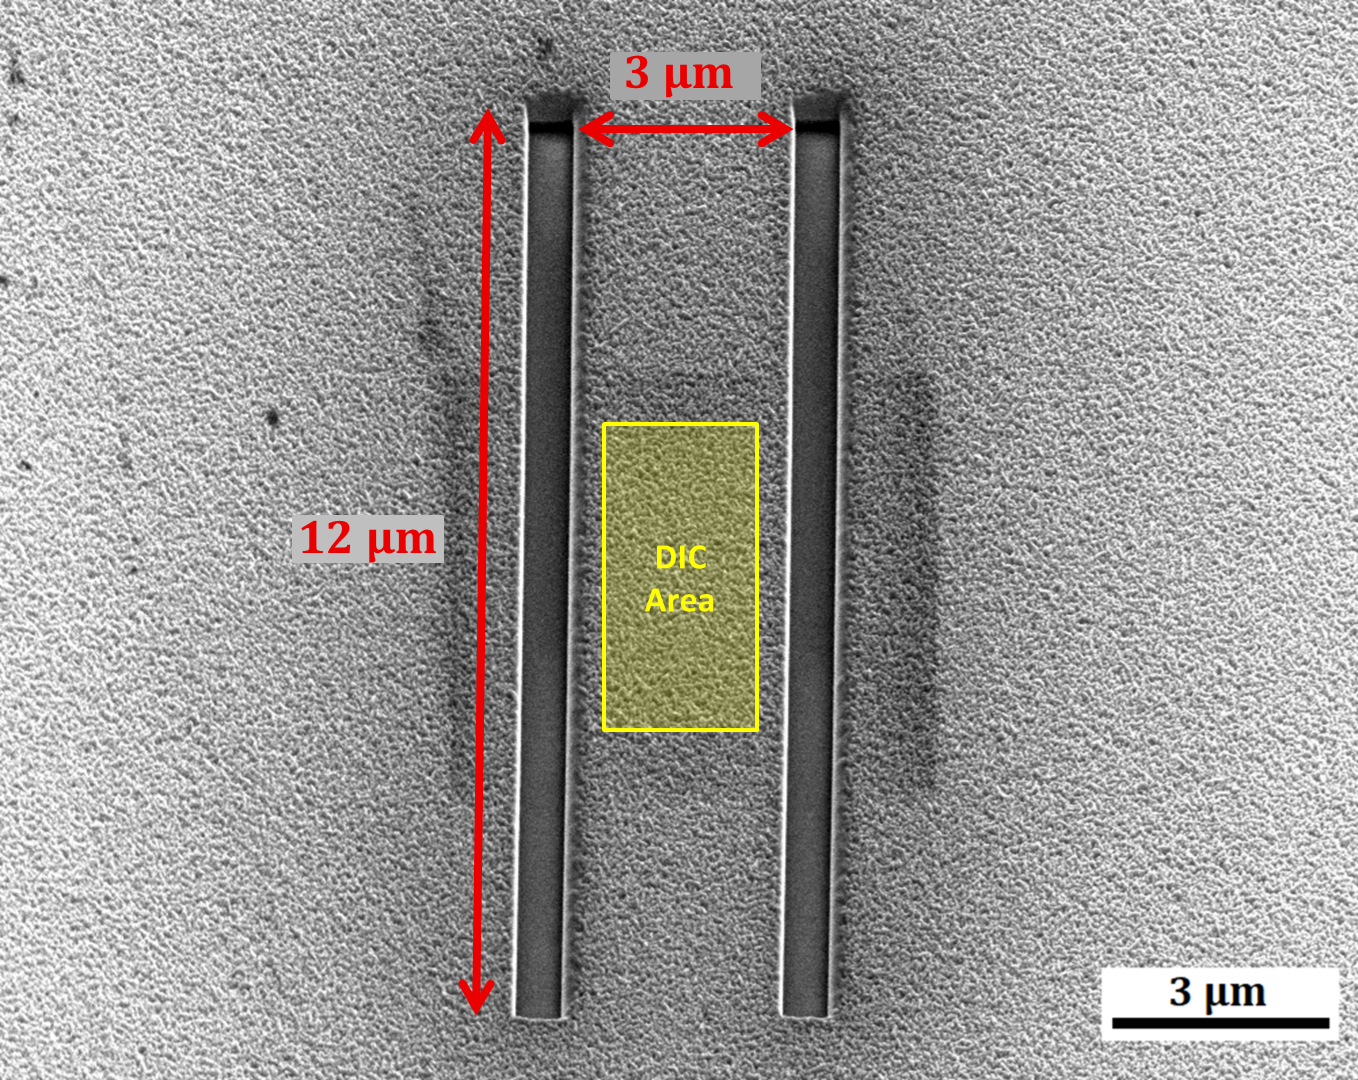
In this work, FIB-DIC was applied to a 0.4 µm-thick SnO2:F based coating on soda lime glass supplied by NSG. Double-slots were milled at the micro-scale (two 1 µm-wide slots spaced by 3 to 10 µm) using a Nova NanoLab 600 DualBeam FIB-SEM (FEI, US) with a Ga+ source operating at 30 kV and 30 pA to locally induce the stress relaxation of the as-deposited coating (Fig. 2). The film was sufficiently conductive for FIB-SEM characterisation without requiring an additional conductive coating which may have affected the stress profile. Two different DIC analysis programs were used and the results compared: an open-source MATLAB code called Digital Image Correlation and Tracking [2] and the commercially available Vic-2D (Correlated Solutions Inc., US).
Fig. 2: SEM micrograph of a double-slot after complete milling through the coating. In this example, the slots consisted of two 12 µm-long and 1 µm-wide trenches spaced by 3 µm. The central rectangular area was imaged by SEM and used for DIC strain analysis.
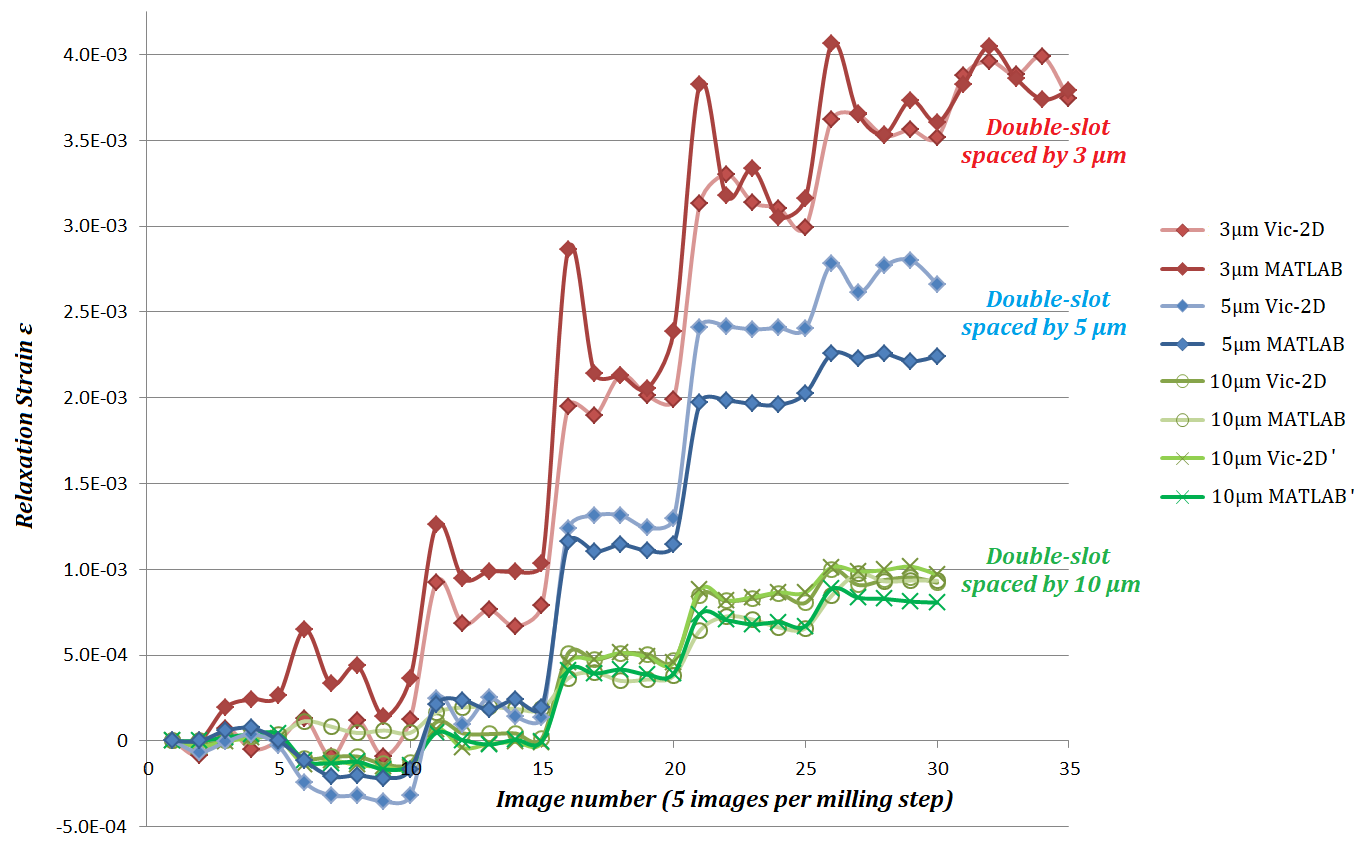
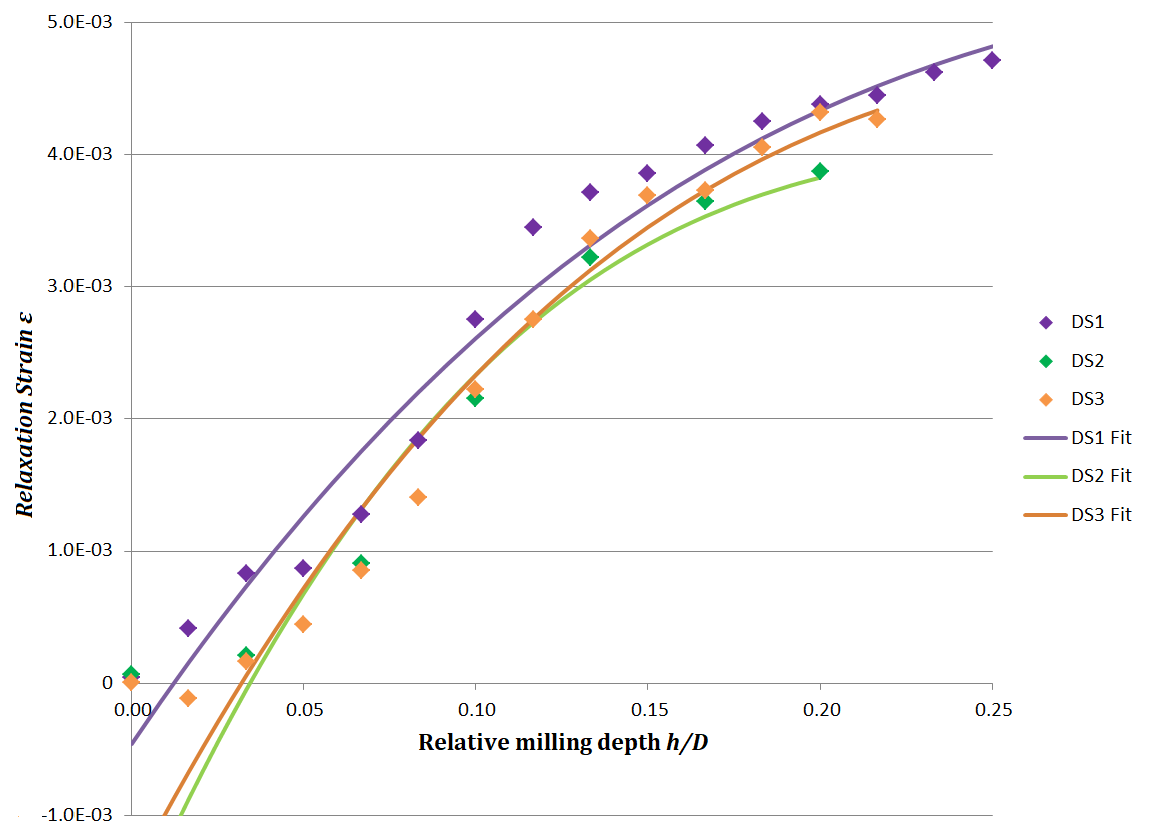
For double slots of different dimensions, DIC windows corresponding to 75% of the slot spacing D were used. In this work, each milling step corresponded to a depth of around 0.1 µm and 5 consecutive SEM images were recorded. Both DIC analysis programs gave comparable and consistent strain results for the individual milling steps (Fig. 3). As expected, the relaxation strains were found to be higher for shorter double-slot spacings. Considering the thickness of the thin film, the shortest spacing used in this work (3 µm) would allow a good approximation of the residual stress at full relaxation using FIB-DIC. Three double-slots were milled using this spacing and analysed by the two DIC programs. The recorded data were averaged for each milling step and plotted as a function of the relative milling depth h/D (Fig. 4). The relaxation strain determined from curve fitting was around 4 × 10--3. Assuming elastic constants of E = 230 GPa and 𝜈 = 0.25 for SnO2, this corresponds to a compressive residual stress of -1.1 ± 0.1 GPa. This value is in good agreement with the range of -1.1 to -1.3 GPa typically measured for such coatings using diffraction techniques such as XRD.
Fig. 3: Horizontal relaxation plotted for each SEM micrograph acquired during the milling procedure. The strains measured by DIC are very consistent for each milling step and increase for shorter spacings D between the slots.
Fig. 4: Horizontal strain plotted as a function of the milling depth and the corresponding curves fitted by least squares regression. The data shown corresponds to results from FIB-DIC applied to three separate 3 µm-spaced double-slots on the 0.4 µm-thick SnO2:F based coating on glass.
FIB-DIC has been successfully applied to measure the residual stresses of a coating deposited on glass. Shorter spacings could be used during the double-slot milling to obtain a more accurate estimation of the strain at full relaxation. Other coatings should now be used to further validate the technique. More complex stacks of different layers would be particularly interesting as FIB-DIC also enables stress depth profiling. This versatile technique is very promising and will offer a better understanding of residual stresses. If a reliable protocol is tailored for non-conductive samples, it could considerably speed up the development of cutting-edge glass products.
- References
[1] Lord et al. (2018). A Good Practice Guide for Measuring Residual Stresses using FIB-DIC, NPL good practice guide N° 148.
[2] Senn (2015). Digital Image Correlation and Tracking. https://uk.mathworks.com/matlabcentral/fileexchange/50994-digital-image-correlation-and-tracking


